---
title: How to Add a Real Time Picture
description: Learn how to add images on map, add instruments on images and move the image location on map with Proqio.
---
[Skip to content](https://help.proqio.com/how-to-add-a-real-time-picture#main-content)
[](https://help.proqio.com/?hsLang=en)
Open main navigation
Close main navigation
How can we help you?
- There are no suggestions because the search field is empty.
1. [Knowledge base](https://help.proqio.com/?hsLang=en)
2. [How to Add a Real Time Picture on Map](https://help.proqio.com/how-to-add-a-real-time-picture-on-map?hsLang=en)
# How to Add a Real Time Picture
## Real-Time Pictures (RTP) in Proqio provide a powerful way to visually represent site conditions by displaying the latest uploaded images alongside live sensor data—offering contextual insight.
### **Proqio offers two distinct ways to visualize real-time images:**
- **Static Picture with Data Overlays**
- RTP [Setup](https://help.proqio.com/how-to-add-a-real-time-picture#Setup).
- [Add](https://help.proqio.com/how-to-add-a-real-time-picture#Add) instrument on RTP
- **Dynamic Picture with Graph**
- RTP [Setup](https://help.proqio.com/how-to-add-a-real-time-picture#Setup-01).
- [Add](https://help.proqio.com/how-to-add-a-real-time-picture#DynamicInstrument) instrument on RTP
- [Move](https://help.proqio.com/how-to-add-a-real-time-picture#Move) or relocate RTP on map
### **Adding Real Time Pictures is simple and powerful. Here’s how to do it:**
#### **1. Setting Up Static Picture with Data Overlays**
1. **Access RTP mode**
- From the top panel on the map interface, select the **Real-Time Picture (RTP)** option.
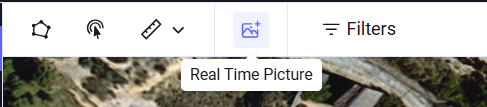
2. **Activate selection tool**
- Click on **Real-Time Picture**. Your mouse pointer will now become a selection tool.
3. **Choose image location**
- Click on the desired spot on the map where you want the image to appear.
- A single click will fix the image location.
4. **Configure the picture**
- The **Picture Configuration** window will appear.
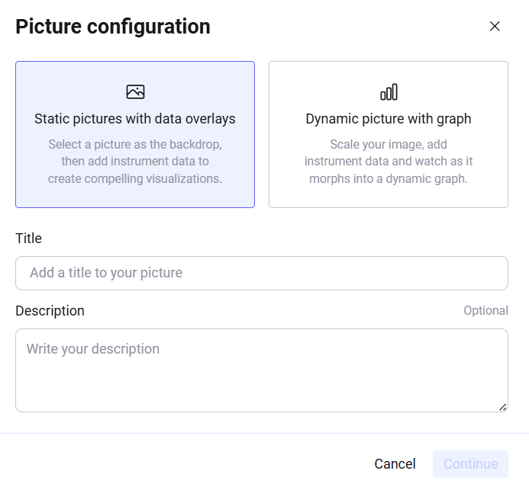
5. **Select image type**
- You will get the following display options:
- - 📌 **Static Picture with Data Overlays**
- 📊 **Dynamic Picture with Graph**
6. **Choose static configuration**
1. In the **Picture Configuration** window, select **Static Picture with Data Overlays** as your image type.
7. **Add details**
- Enter a **Title** for the image.
- Optionally, add a **Description**.
- Click **Continue**.
8. **Upload your image**
- **Browse** and select an image from your system.
- Open the image and click **Continue** to finalize the process. The image will appear on the map at the location you selected earlier.
#### **2. Setting Up a Dynamic Picture with Graph**
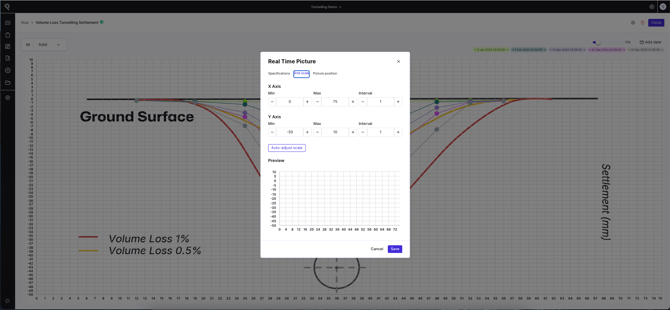
1. **Configure graph scale**
- In the **Picture Configuration** window, define the scale for your dynamic picture by setting the **maximum and minimum values** for both the **X and Y axes**.
2. **Proceed to image selection**
- Click **Continue** to move to the next step.
- Select an image from your system and open it.
3. **Adjust picture position and scale**
- You’ll now see the **picture position and scale** interface.
- Here, you can **arrange and resize** the image to fit your desired layout on the map.
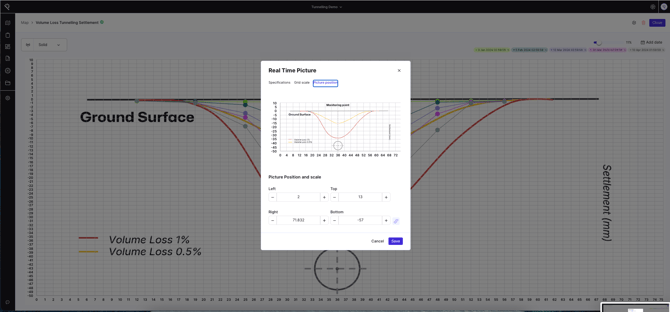
4. **Finalize setup**
- Once satisfied with the positioning and scale, click **Continue** to complete the configuration
**Preserve Proportion (Important!)**
- Next to the **Bottom** field, you’ll notice a **chain link icon **.
- This icon is called **Preserve Proportion** and ensures the image maintains its original height-to-width ratio.
- 🔒 **Do not modify this icon**—it automatically keeps the image proportionate.
---
### **How to add Instruments on the Real Time Picture.**
#### **Static Picture with Data Overlays**
Proqio allows you to enhance your static images by overlaying live instrument data—either during the initial image setup or later using the **Edit** feature.
**Add Instruments using the Edit option**
You can add instruments at any time by following these steps:
1. **Open the image for editing**
- Click on the image placed on the map to view it.
- Select the **Edit** option from the **top-left corner** of the interface. ****
2. **Choose your action**
- You’ll see two icons: 
- **Add Instrument**
- **Insert Real-Time Picture **
3. **Activate the selection tool**
- Click on the **Add Instrument** icon.
- Your cursor will now become a selection tool.
4. **Place the instrument**
- Click on the desired location within the image.
- This will fix the instrument’s position.
5. **Assign instrument details**
- Select the appropriate **Category**.
- Choose the **Instrument ID** from the list.
6. **Finalize placement**
- Once selected, the instrument will appear on the image with its live data overlay.
- You can view the data by clicking the instrument.
**Important Note:**
Once an instrument is placed on the image, its position **cannot be moved**.
To reposition it:
- Delete the existing instrument, by right click on the instrument.
- Repeat the placement process at the required location.
**Bonus Feature: Insert Image Within Image**
Just like adding instruments, you can also embed another image using the **Insert Real-Time Picture** icon—ideal for layering or zoomed-in visuals.
#### **Dynamic Picture with Graph**
Enhance your dynamic image by overlaying live instrument data that syncs with graph axes. Follow these steps to configure and place instruments accurately.
**Step 1: Open the image for editing**
- Click on the image already placed on the map to open it.
- Select the **Edit** option from the **top-left corner** of the interface.
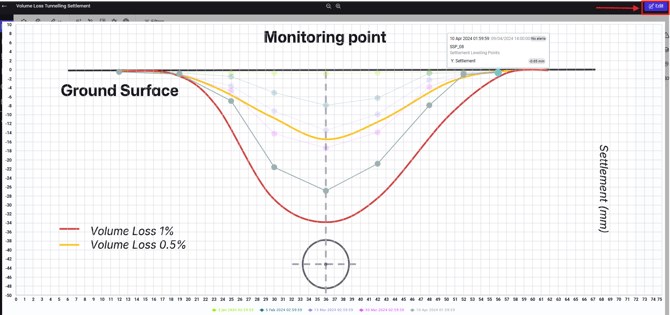
**Step 2: Access the add instrument window**
- Click on the **Add Instrument** icon.
- This will open the **Add Instrument** configuration panel.
**Step 3: Configure instrument parameters**
The **Add Instrument** window includes the following fields:
| **Parameter/Fields** | **Purpose** |
| --- | --- |
| **Category** | Select the instrument category (e.g., displacement, pressure). |
| **Instrument ID** | Choose the specific instrument to be placed. |
| **Data Field** | Select the data field to be displayed (e.g., Temp, Tilt-AxisA (SINA)...). |
| **Dynamic Axis** | Choose either **X Axis** or **Y Axis** using radio buttons. |
| **Add Second Dynamic Field** | Optionally include a second data field for comparison. |
| **X Position / Y Position** | Set the instrument’s location on the image based on axis selection. |
**Axis & Position Logic**
**Note**: The **Dynamic Axis** selection directly affects how you set the instrument’s position:
- If you select **X Axis**, you’ll define the **Y Position**.
- If you select **Y Axis**, you’ll define the **X Position**.
This ensures the instrument aligns correctly with the graph’s orientation.

**Step 4: Finalize placement**
- Once all fields are filled in, click **Add Instrument**.
- The instrument will be placed on the image and begin displaying real-time data in sync with the graph.
**Good To Know**:
Want to relocate an image or Move Picture, It’s quick and easy with Proqio:
- **Right-click** on the image you want to move on the Map.
- Choose the **“Move”** option from the menu .
- **Click** on your desired location on the map — the image will instantly shift to that spot.
---
### Frequently Asked Questions (FAQs)
**Q1: Can I add live instrument data to a static image?**
**A**: Yes! You can overlay live data during setup or later using the **Edit** option.
**Q2: Can I move an instrument after placing it?**
**A**: No. To reposition, you must **delete** the instrument and place it again.
**Q3: What happens if I modify or unlink "Preserve Proportion”?**
**A**: If you unlink **Preserve Proportion** it allows you to change image width and height independently. This may cause the image to look stretched or squashed as unlinking this option it will not automatically keep the image proportionate.
**Q4: What is the difference between Static and Dynamic Pictures?**
Static Pictures allow overlaying live data without graph scaling whereas Dynamic Pictures include graph axes and require scale configuration for X and Y axes.
- [Getting started](https://help.proqio.com/getting-started?hsLang=en#main-content)
- [Project details](https://help.proqio.com/getting-started?hsLang=en#project-details)
- [Teams and members](https://help.proqio.com/getting-started?hsLang=en#teams-and-members)
- [Account](https://help.proqio.com/getting-started?hsLang=en#account)
- [Configure Your Instruments](https://help.proqio.com/getting-started?hsLang=en#configure-your-instruments)
- [Notifications](https://help.proqio.com/getting-started?hsLang=en#notifications)
- [Connectivity methods](https://help.proqio.com/getting-started?hsLang=en#connectivity-methods)
- [Alerts](https://help.proqio.com/getting-started?hsLang=en#alerts)
- [Map](https://help.proqio.com/map?hsLang=en#main-content)
- [Tools](https://help.proqio.com/map?hsLang=en#tools)
- [Analysis](https://help.proqio.com/map?hsLang=en#analysis)
- [Monitoring](https://help.proqio.com/monitoring?hsLang=en#main-content)
- [Instruments](https://help.proqio.com/monitoring?hsLang=en#instruments)
- [Dashboard Creation & Configuration](https://help.proqio.com/dashboard-creation-configuration?hsLang=en)
- [Report Creation](https://help.proqio.com/report-creation?hsLang=en)
- [New Feature Releases](https://help.proqio.com/new-feature-releases?hsLang=en)
- [Project Hierarchy](https://help.proqio.com/project-hierarchy?hsLang=en)
- [Analyse and Interpret your Data](https://help.proqio.com/analyse-and-interpret-your-data?hsLang=en)
- [Learn How to Navigate Proqio](https://help.proqio.com/learn-how-to-navigate-proqio?hsLang=en)
- [Configure Your Map View](https://help.proqio.com/configure-your-map-view?hsLang=en)
- [How to Add a Real Time Picture on Map](https://help.proqio.com/how-to-add-a-real-time-picture-on-map?hsLang=en)
- [Managing Your Data](https://help.proqio.com/managing-your-data?hsLang=en)
- [Uploading Records Manually](https://help.proqio.com/uploading-records-manually?hsLang=en#main-content)
- [Steps for uploading instrument data records manually](https://help.proqio.com/uploading-records-manually?hsLang=en#steps-for-uploading-instrument-data-records-manually)
- [ADA](https://help.proqio.com/ada?hsLang=en)
- [Digital Twin](https://help.proqio.com/digital-twin?hsLang=en)
- [Lines and Textures](https://help.proqio.com/lines-and-textures?hsLang=en)
[](http://www.proqio.com?hsLang=en)
Copyright © 2026, Proqio
```json
{
"@context" : "https://schema.org",
"@type" : "VideoObject",
"contentUrl" : "https://stream.mux.com/BaN5gWnOKbkTv00LiEYOsTVwOe7nEy1YuOv3g46yAaY4/capped-1080p.mp4",
"dateModified" : "2025-08-07T04:14:23.495Z",
"duration" : "PT32S",
"height" : 854,
"name" : "Screen Recording 2025-08-07 094152",
"thumbnailUrl" : "https://145149017.fs1.hubspotusercontent-eu1.net/hubfs/145149017/Screen%20Recording%202025-08-07%20094152.mp4/medium.jpg",
"uploadDate" : "2025-08-07T04:14:06.131Z",
"width" : 1884
}
```
```json
{
"@context" : "https://schema.org",
"@type" : "VideoObject",
"contentUrl" : "https://145149017.fs1.hubspotusercontent-eu1.net/hubfs/145149017/V%C3%ADdeo%20sin%20t%C3%ADtulo%20%E2%80%90%20Hecho%20con%20Clipchamp.mp4",
"dateModified" : "2025-10-20T12:04:41.766Z",
"duration" : "PT1M14S",
"height" : 1080,
"name" : "Vídeo sin título ‐ Hecho con Clipchamp",
"thumbnailUrl" : "https://145149017.fs1.hubspotusercontent-eu1.net/hubfs/145149017/V%C3%ADdeo%20sin%20t%C3%ADtulo%20%E2%80%90%20Hecho%20con%20Clipchamp.mp4/medium.jpg",
"uploadDate" : "2025-10-20T12:04:30.169Z",
"width" : 2520
}
```
```json
{
"@context" : "https://schema.org",
"@type" : "VideoObject",
"contentUrl" : "https://stream.mux.com/6ykOXhoBTFWQiCCY200PI8jRoe00yDPKGcE017WMX3UCNU/capped-1080p.mp4",
"dateModified" : "2025-08-07T04:40:38.187Z",
"duration" : "PT21S",
"height" : 926,
"name" : "Screen Recording 2025-08-07 100902",
"thumbnailUrl" : "https://145149017.fs1.hubspotusercontent-eu1.net/hubfs/145149017/Screen%20Recording%202025-08-07%20100902.mp4/medium.jpg",
"uploadDate" : "2025-08-07T04:40:32.934Z",
"width" : 1892
}
```
```json
{
"@context" : "https://schema.org",
"@type" : "VideoObject",
"contentUrl" : "https://stream.mux.com/6Ggo3PgBP1TvKHGXNFy5sozRaPZhFBTONT4QmcntHtk/capped-1080p.mp4",
"dateModified" : "2025-10-09T03:34:26.333Z",
"duration" : "PT26S",
"height" : 918,
"name" : "Screen Recording 2025-10-09 090306",
"thumbnailUrl" : "https://145149017.fs1.hubspotusercontent-eu1.net/hubfs/145149017/Screen%20Recording%202025-10-09%20090306.mp4/medium.jpg",
"uploadDate" : "2025-10-09T03:34:22.368Z",
"width" : 1902
}
```